For those who made it this far into my website, welcome to my new blog addition! It took a fair amount of work to convert my static Bootstrap portfolio. Three months later, though, and my custom WordPress theme is a reality.
I initially looked at a tutorial on turning a very basic website into a custom WordPress theme. It didn’t have all the components I needed, though. Plus, the accompanying headaches from trying to iron out all of the issues I was seeing on my own, it was daunting.
I looked at various third-party blog solutions available. Basically, just tacking on a functioning blog to my existing site. I wanted to avoid complexity, but I also wanted a seamless design that didn’t look like I cobbled together two different websites. The solution to my problem just kept coming back to a custom WordPress theme.
There were plenty of headaches to be sure, though not half as many as I had anticipated. If you would like to know more about how I got here, please read on.
Bootstrap to WordPress
My website is built using the Bootstrap 3 framework, so I was wondering how a transfer to WordPress would go. If you are not familiar with Bootstrap, it’s a great responsive framework for building responsive websites quickly. I didn’t want to lose the responsive nature of my website, but I was worried about the slow down a database-driven site might incur. Surprisingly, this was a fairly straightforward process that only elicited a few hiccups along the way. Plus, my site is as snappy as it’s always been.
I would like to give a big shout out to Adam Burkenpas. He has some great tutorials over on YouTube for transitioning a Bootstrap website into a custom WordPress theme. He really got me on the right path to figuring out what I needed to get my theme up and running. You probably won’t find an exact solution to your particular project by following along, but he can definitely get you in the ballpark.
Navigational Issues
My first big hurdle was figuring out how to develop the navigation. My initial website was a single page portfolio that used easing animation to scroll smoothly from one section to the next. This configuration wouldn’t really work with additional pages, though. I was trying use the navigation one way on a certain page, but another on the “blog” pages. This runs counter to how navigation works in WordPress (without the help of a lot of javascript) and isn’t great user design, either. As a result, my first theme attempt went down in flames. I was forced to go back to my initial site design, rework the navigation, and “Viola!” I was back on track. What started out as a single page site became three main pages, plus the individual blog post pages.
Dealing with Plugins
The next issue I had was figuring out why some plugins worked and others didn’t. As it turned out this resulted from a couple issues. Some plugins didn’t work with the default version of JQuery that WordPress calls. I needed to deregister the default version of JQuery and then register and enqueue an earlier version to make sure all my plugins worked correctly.

*Deregistering the default version of JQuery and registering and enqueuing an earlier version.
The other problem I was running into was that some plugins were being called when not used, throwing an error, and then causing other plugins not to fire as a result. I needed to write in a conditional statement to enqueue certain plugins only on specific pages. For example, the plugin to make the comments section operate correctly only needs to be fired on the pages with blog posts, or the Google Maps API is only called when viewing the Home Page. This problem ultimately helped me gain some understanding about creating the functions.php page, and ideally, the less plugins being loaded on a page the faster said page should load.

*Conditionally enqueuing comments plugin if on a post page, if comments are
allowed, and then if nested comments are allowed.
Template Confusion
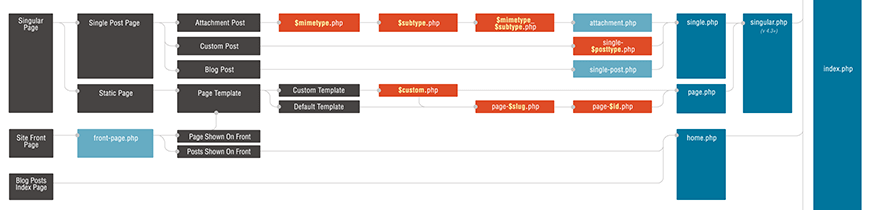
*WordPress template hierarchy, courtesy of WordPress.org.
One of the problems that took a while to sink in was the template heirarchy of a WordPress site. This is a little confusing as a newcomer. In static web design, your index page is your home page. In WordPress the index is the fallback page that is loaded when all others can’t be found. The Admin area under Settings > Reading helps you out with this somewhat by allowing you to designate whether you have a static homepage or if the blog is also on the homepage.
You can name your pages whatever you want in the Admin, but when building out your templates, if you have a static homepage (home page without a blog) you call that template front-page.php, and you call your blog template home.php. So my static Home page calls the front-page.php template and my Blog page calls the home.php template. If my home page also contained my blog, then I would omit the front-page.php template all together and just use the home.php template. No chance for confusion, right! By the by, you can read all about the template hierarchy, as well as find the image above by going to WordPress.org, or just clicking here.
Template Naming
It should be noted that when you are not dealing with a static front page or a blog page, you can name your templates in a PHP statement in the template and then assign that specific template via drop down in the Admin area when you are creating your pages.
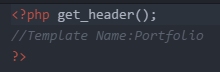
*Naming the template to be called later in the Admin when creating pages.
For instance, my website has a Portfolio page. While I named the template for the Portfolio page portfolio.php, I also set a name “Portfolio” in a statement in the template. Once I created the Portfolio page in my WordPress admin, I then selected “Portfolio” from the template drop down menu to assign that specific template.
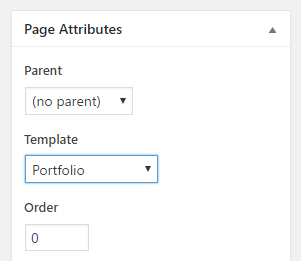
*Selecting Portfolio template in Admin when creating Portfolio page.
Understanding the template hierarchy also helped when building out the pages for the blog. Your home.php template deals with the collection of blog posts. The template for each individual post is named single.php. If you have a clickable name for the author of the article you can set up an author.php template, and if you plan on allowing commenting for your posts then you need to create a comments.php template to handle that.
Making Comments
The last real issue that I had was the comments section. I had to figure out implementation and why the comments plugin wasn’t working. It turned out the plugin was broken for the reason I mentioned above. Another plugin was being called on a page that it wasn’t being used on and throwing an error that caused the comments plugin not to fire. That was an easy fix.
For the rest, I want to thank Austin Gregory at AwfulMedia. I just needed help specific to the comments section, but he provides an easy to follow set of videos on YouTube that walk you through the whole process of setting up a custom WordPress theme. With his help I was able to generate my own custom comments section and style them the way that I wanted.
Final Thoughts
All in all, this process was very rewarding. I had a very specific goal for my site, and it turned into a learning experience that I am able to use in my professional work. I have been wanting to write articles about my experiences for others that are getting into web design and development. This required that I step out of my comfort zone a bit to achieve my goals. It was three months of battling through issues that I didn’t have a whole lot of experience with, but it ended up being a three-fold win for me. I have my seamless blog. I have opened up a new level of skills and understanding about creating a custom WordPress theme that I can now provide for my clients. Lastly, I can write about my experiences on my blog in the hopes that I might help other folks with their projects. Circle of life!
See you in the next post.
Post a Comment